

Pose- processing 처리


포스트 프로세스설정과 관련된 것을 볼지 선택하는 형식인듯 하다.


https://www.unrealengine.com/en-US/blog/download-our-new-blender-addons
Download our new Blender addons
We’ve released two new, free addons that greatly streamline the workflow between Blender and Unreal Engine.
www.unrealengine.com
===================================================================================
기본적인 블렌더 FBX 옵션 분류

Include를 제외하더라도 4개
Transform
Geometry
Armature
Animation

2.3 최신버전에서는 이렇게 해야지 보내지는게 일단 확인됬는데
솔직히 설정할때마다 다시창을 열어야하니 불편하다.
1.84기준으로 4.27과 연동이 되는게 확인 됬다.
버전 마다 호환되는게 다른것 같다.
send to Unreal


Automatically scale bones : automatically scales your armature object so they
import in a scale of one so if you didn't do an item
scale of one it supposedly fixes it, but this is I wouldn't trust it.
//아마 스케일 1로 자동으로 익스포트 하는 기능으로 추정
Export all actions : 애니메이션과 관련된걸로 추정됨
Auto stash active action : when you ahve a action that is not pushed down
it will automatically be pusehd down (이 강의에서는 하지 않는다고하는데
어떤게 아래로 갈지 구별해야하기 떄문에 안쓴다고 하는데
좀 더 블렌더 기능을 알아야 어떤건지 알것 같다.)

better fbx importer 에서는 상기 기능이 자동으로 설정된거 같다.

Apply Unit : cm 단위 설정된걸 적용한다는것 같다.
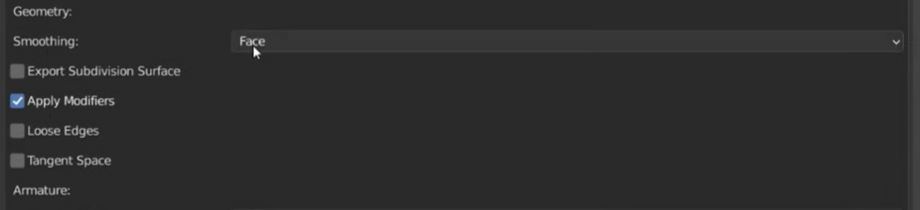
smoothing : is usually "Normals Only" 지금은 Face로 했는데 두개의 차이는 모르겠다.
Normals only를 하면 노말만 익스포트 되는 스무싱 처리인것 같고 Face로 하면 뭔가 스무싱처리되는것 같은데..
(Later)

Primary bone Axis : 본의 연결을 가리키는 방향이 X가 되어야 함
Secondary bone axis : Y가 되어야한다는데 그러면
더 해깔리게 왜 블렌더에서는 일부가 Y가 Primary bone이 아닌지
그걸 왜 처음부터 설정안한건지 더 해깔린다.

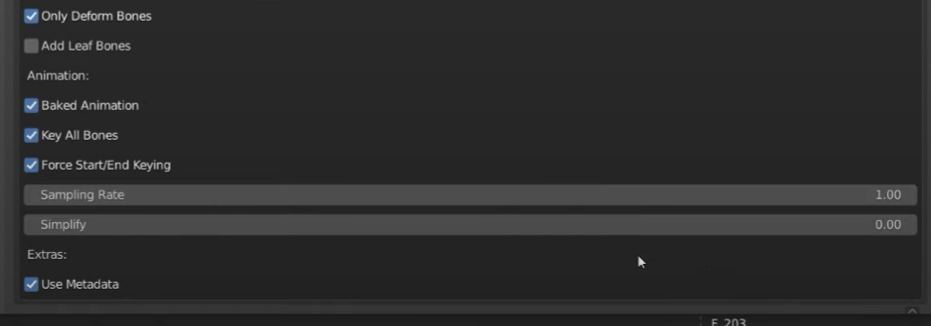
key all bones : one key of animation for all bones needed with
some target applications like unreal engine 4
so this is definitely we want
Force start/ End Keying : 애니메이션을 루프하기 위해 필요해서 체크해줘야 한다고함
Samplig Rate : is just how many samples it takes
Simplify : when you go to file export fbx it s usually one

6:30 clear constraints가 신경쓰임
대충여기 까지고 엔진 내에서 설정도 봐야하는데
============================================================================================

Skeletal mesh : because it has a skeleton
Import Content Type : we want to import the geometry into skinny weight
Skeleton : 기존에 있는거랑 동일시할지 선택하는것 같다.

Vertex Color : 중요하다고 묘사 및 Replace로 일단 설정
Import Morph Targets 까지는 중요하지 않다고 했고
Shape key를 임포트하고 싶을떄 설정
Import Mesh LODS : LOD를 가진경우에 체크하는것 같은데
아마 이름도 LOD1 LOD2 이런식으로 뒤에 붙은 FBX 파일만 해당하는것 같다.
Normal Import Method : Compute Normals 여기서는 애니메이션 캐릭터니까 이렇게 한건지 모르겠지만 노말 캐릭터는 아마도 임포트 노말로 해야할지도 모른다.
Import Normals로 설정 할시
So that we are actually importing the normals from our fbx
while for this character it wouldn't matter much
but for other characters where we manipulated the normals
it might be more important
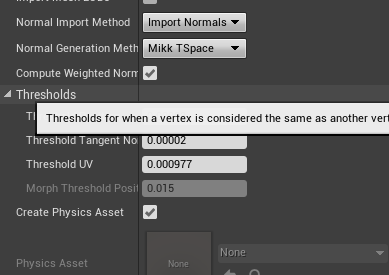

Thresholds Position : basically just asking us how much of a distance of vertics
should be merged together so basically closer vertices are
going to be merged together 너무 근접한 버텍스들이 오류가 생기지 않도록
설정하는 오류
Threshold Tangent Normal :
Threhold UV :
상기 두개 옵션은 그냥 아주낮게 해주는게 좋다고 한다.
합쳐지는걸 원치 않는다고 한다.

Create Physics Asset : 일단 체크, 아마도 Physics를 생성하고
나중에 Kawai Physics 같은데서 수정할것으로 사료됨

Import Animations : Animation을 임포트해야하니 당연히 체크해주고
Animation Length : exported time
should be giving accurate time result we have in blender

Import Meshes In Bone Hierarachy
: this should all be default
Do not import curves with 0 values : this is related to the morph target

이거는 캐릭터가 누워 있게 임포트 되는걸 방지하는 옵션 같고

Miscellaneous
: this should aslo be default convert to scene
여기까지가 기본설정이고 Import All을 누르면 된다. ^^
====================================================================
'Unreal_Engine' 카테고리의 다른 글
| AnimBlueprint Explained-3 (0) | 2023.04.18 |
|---|---|
| Blender to UE4 animation Pipeline_04 (0) | 2023.03.21 |
| AnimBlueprint Explained (0) | 2023.03.15 |
| AimOffset Explained -1 (0) | 2023.03.03 |
| 콜리전 UCX_Name 정리(Collision_UCX) (0) | 2023.02.26 |


